Monday, 5 December 2011
Animating the Head
I came up with a very simple idea to animate the head. The animation features a polo flying around the the head model, with the eyes of the model watching it before the model then opens his mouth and puts his tongue out, where the polo then lands and ends with the head swallowing the polo.
This was quite a simple animation to produce, with the rotation tool used for the movement of the eyeballs and the morpher modifier used for the opening and closing of the mouth. The polo simply moves by changing the position for certain keyframes.
The morpher modifier allowed me to create realistic mouth movement by cloning the head, moving the vertices of the mouth to an open position on one model and a closed position on the other model and filling the gap for me.
Sunday, 4 December 2011
Adding Hair

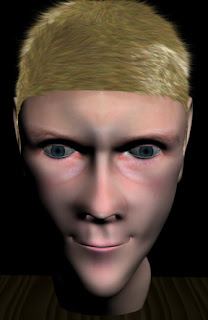
To create the hair, I simply highlighted the faces on the top of the head that needed hair applying and added the hair and fur modifier. This was the first time I'd ever used the hair and fur modifier in 3D Studio Max.
I chose a pre-set option for the colour of the hair and, although a little light, I think it was the closest option to my actual hair colour.
To achieve the correct style was a matter of cutting the hair, re-combing it into place to follow the faces of the head and then use the brush tool to sweep it aside at the front.
I found that the hair took the longest time to render, and would only render in perspective mode. However, this was not a problem in the end and the addition of hair made the model look far more realistic.
Tuesday, 29 November 2011
UVW Mapping and Skin Textures

This was the most difficult part of the creation of the head model. I began by adding an unwrap UVW modifier onto the head model and placing the cylindrical gizmo over the head. Then, after adding a checkered material to the head I began editing the UVWs in order to give a smooth material. By selecting trouble areas of vertices I could use the relax tool in order to try to alleviate the problems. I found this quite hard to do, possibly due to some troubles with model structure around the side of the head.
The next task was to use pelt mapping in order to solve the UV problems of the ear. By moving and scaling the stretcher, and then pulling the strings into the correct direction, I could simulate pelt pulling in order to pull out the vertices of the ear. by now the shape of the UV points was too large, so I had to scale the ear down to the correct size.
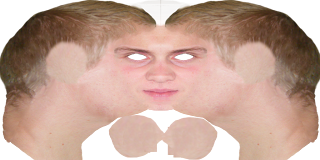
Having now got one side of the face and one ear complete, I could simply mirror these across to give the full UVW-mapping of the face and then render the UVW map.
The next stage was to create a skin texture in Adobe Photoshop CS5, using this UVW map as a guide. I am fairly confident with Photoshop and managed to create a reasonably good skin texture here, cutting and pasting sections of skin from the reference photos into the right places.
After this was finished, a bump map was also created in Photoshop. this was done in order to bring out more detail in the skin. In 3D Studio Max, it was then a case of creating a suitable material, using the mix option in the material browser to create a suitable blend of the skin map and bump map in order to bring out maximum detail in the skin
I did have a lot of trouble with the UVW mapping part of this assignment. The final result wasn't brilliant and there are a lot of areas which could be improved. I believe the Photoshop work went fairly well, the problems were caused in UVW-mapping in 3DS Max (and possibly stemmed from structure problems). This is something that I will definitely need to work on.
Monday, 14 November 2011
Eye and Eyelash Creation

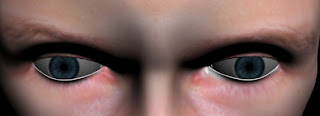
In order to make the eyes, I began by going to the extended primitives menu and creating a capsule. I converted this to an editable poly and removed the middle ring of faces, joining the two sides left to form a rough sphere shape. I then cloned this shape by holding down shift and using the scale tool.
I applied a MeshSmooth modifier and on the outer sphere pulled the vertices at one end to give a slight bulge shape. On the inner sphere I pushed in the vertices of one end in order to flatten that end. I now had a basic eyeball. On the inner sphere I could apply the eyeball texture, whilst I made the outer sphere of a water material in order to give the eyes a wet look.
The next step was to create the eyelashes. I did this by creating a few different spline curves and extruding thin cylinder shapes along these splines. I then changed the taper parameter so that the cylinders grew thinner towards the end.
In order to fit these eyelashes I simply cloned lots of cylinders and placed them around the eyesocket. In the final render the eyelashes aren't that noticeable, however they do give crucial detail to the eye area of the model.
Wednesday, 2 November 2011
Ear Creation

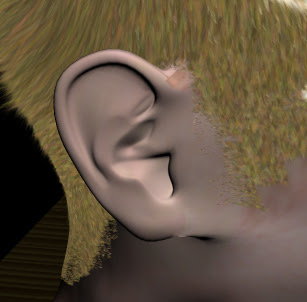
To create the ear I began in the same way as I had created the face - by using the reference planes to lay out quads and then pull the vertices out in order to make the shape 3-dimensional. However, the ear is a very complex shape and I found this more difficult to model than the face.
One tool that came in very useful in modelling the ear was the chamfer tool. This enabled me to create better canals in the ear and achieve a more organic shape. Once again, the use of the TurboSmooth modifier allowed me to smooth the ear into a better finish.
I also found it quite hard to attach the ear. As with the back of the head, this was done using the weld and target weld tools. I started this process by removing faces from the head. I then created some new faces on the ear which could be used to join to the head.
In the end I think I achieved quite a good ear design. It does look slightly rigid and could be improved in the future for a more organic look, however the overall shape is quite well designed.
Tuesday, 18 October 2011
Creating the back of the head
In order to create the back of the head, I began by creating a standard sphere primitive. I then converted this into an editable poly and took out the bottom half of the sphere. Now I could use the reference planes to line-up this editable sphere poly and then pull the edges and vertices around in order to better shape the head. Once the head was the correct shape, the use of the weld and target weld options enabled me to join the head to the face.
I found most of this part of the head reasonably simple to model. However, one area that was a bit more tricky was the sides of this shape. Since I had earlier deleted the middle faces of the sphere, it was hard to join these correctly. Once completed, I again used the TurboSmooth modifier to give the shape a very smooth finish.
I found most of this part of the head reasonably simple to model. However, one area that was a bit more tricky was the sides of this shape. Since I had earlier deleted the middle faces of the sphere, it was hard to join these correctly. Once completed, I again used the TurboSmooth modifier to give the shape a very smooth finish.
Thursday, 6 October 2011
The Symmetry Modifier
In order to duplicate the topology that I had already created over to the other side of the face I used the symmetry modifier. By moving the mirror plane around, I could achieve the correct mesh. It was then simply a matter of dropping down into editable poly mode whenever I needed to edit part of the face and the modifications would then automatically reflect over through the symmetry modifier.
Once the symmetry modifier was applied, I also applied the TurboSmooth modifier. This was used in order to obtain a nice smooth finish as the shapes created earlier made for a very low-resolution face.
Once the symmetry modifier was applied, I also applied the TurboSmooth modifier. This was used in order to obtain a nice smooth finish as the shapes created earlier made for a very low-resolution face.
Wednesday, 5 October 2011
Using Splines to Model a Head - Phase Two

This was the second phase of using the splines to create the basic 3-dimensional topology of the face. In this phase, the vertices created last time were all lined-up on the Z-axis using the side-view reference plane. This was achieved using the Edit Poly modifier.
In order to do this accurately it was important to make the shape see-through. This allowed a better view of the reference plane with which to line-up the vertices.
Upon completing this section, I have now ended up with the basic 3D topology of one side of the face. This is a good basis to move forward.
Tuesday, 4 October 2011
Using Splines to Model a Head

In this stage the reference planes were used as a basis to model the face. In 3D Studio Max, the line tool was used in conjunction with the snap tool to draw splines that snapped directly onto each other. These splines were then filled to create faces that would make up the topology of the face that was defined on the reference planes.
By sticking to the reference planes, the result was good and I was happy with the outcome. It was very important to get this early stage right else I would've risked compromising the rest of the project. Now I can move forward to add a third dimension to this currently flat topology.
Saturday, 1 October 2011
Reference Planes

To create reference planes for the head model, two pictures were taken of my head - one of the front elevation and the other of the side elevation. These pictures were then imported into Adobe Photoshop CS5.
In Photoshop, the images were placed next to each other and the first task was to line up all the key features such as the eyes, nose, mouth and chin. Using the rulers in Photoshop as a guide, I found that this was relatively straightforward and I managed to achieve a very good alignment.
Once the images had been aligned, the next task was to define the topology of the front elevation of the face and of the ear. This was not so straightforward. I used the pen tool in order to get the most accurate topology lines possible, however I found it very difficult to define the topology. In the end I did manage to achieve a fairly flowing sequence of quads across the face, but it was a challenging task. These reference planes will now be crucial when it comes to modelling the face.
Friday, 23 September 2011
Reaction to the Brief
My initial reaction to the brief is that this will be a very challenging module, building on the skills and techniques that were learned in the second year 3D Modelling and Animation module. I very much enjoyed working with 3D Studio Max last year and I am looking forward to working with this program again, expanding my knowledge of the software and learning new techniques.
The first part of the assignment for this module will be to create a model of my face. Knowing what I already know about 3D Studio Max, I predict this will be a complicated assignment, but one which will give great satisfaction once achieved. Last year I modelled the Golden Gate Bridge, however this was a fairly rigid structure with less curvature. I have no doubt that the face will present an even bigger challenge.
The second part of the assignment for this module will be to create an animation of how the Guildhall in Finchingfield has been used over the centuries. This is a group project. Once again I feel this will be a very complicated process and therefore, in order to achieve maximum results, it will be important that the work is shared out equally between all members of the group and that everybody pulls together. However, I am very much looking forward to the challenge of this module and seeing the final production.
Subscribe to:
Posts (Atom)